Did you know the average person receives around 121 emails per day? With inboxes constantly flooded, how can your email stand out and earn that crucial click? The key lies in personalization and timing–sending the right email at the right moment based on user engagement.
Email nurturing is a powerful B2B strategy to build relationships with potential clients by guiding them through time-based campaigns. Whether it’s encouraging them to take an offer, sign up for a demo, or schedule a consultation, well-timed follow-ups can significantly improve lead conversion.
SendGrid’s webhooks help automate this process by tracking real-time email events such as opens, clicks, bounces, and more. When integrated with a platform like Orkes Conductor, the Unified Application Platform, these events can trigger automated and personalized responses.
This guide demonstrates how to leverage SendGrid webhooks to create an automated email nurturing workflow.
Building an email nurturing flow
To illustrate how email nurturing works, let’s use the example of a product launch email campaign.
When the campaign is sent, we consider two key scenarios: subscribers who open the email and those who click a link. To further nurture interest, follow-up emails are customized based on subscriber engagement.
Here’s the workflow to achieve this:

The Wait for Webhook task listens for incoming event payloads from SendGrid webhooks, while the Switch task determines the follow-up action based on whether the event is an open or a click.
The Wait task introduces a grace period before follow-up emails are sent via an HTTP task using SendGrid’s API.
Here’s an overview of the system we are going to build:
- Create an email nurturing workflow in Conductor.
- Get the API key from the SendGrid account.
- Store the SendGrid API key as a Secret in Conductor.
- Create a webhook in Conductor.
- Configure a webhook event in SendGrid.
- Modify and run Conductor workflow.
- Create a Single Send in SendGrid.
- Automate the flow using Conductor’s Workflow Scheduler.
Follow the tutorial using the free Orkes Developer Edition. Sign up for an account to get started.
Step 1: Create an email nurturing workflow
In Orkes Conductor, application flows can be built as JSON workflows using SDKs, APIs, or Conductor UI.
In this tutorial, let’s create the workflow using Conductor UI.
To create the workflow:
- Go to Definitions > Workflows from the left navigation menu on your Conductor cluster.
- Select + Define workflow.
- Select the Code tab on the right and paste the following code:
{
 "name": "emailNurturing",
 "description": "An email nurturing flow",
 "version": 1,
 "tasks": [
   {
     "name": "webhook",
     "taskReferenceName": "webhook_ref",
     "inputParameters": {
       "matches": {
         "request[0].event": "${workflow.input.input}"
       }
     },
     "type": "WAIT_FOR_WEBHOOK"
   },
   {
     "name": "switch_event",
     "taskReferenceName": "switch_ref",
     "inputParameters": {
       "switchCaseValue": "${webhook_ref.output.request[0].event}"
     },
     "type": "SWITCH",
     "decisionCases": {
       "click": [
         {
           "name": "wait_before_click_follow_up",
           "taskReferenceName": "wait_ref_1",
           "inputParameters": {
             "duration": "10 seconds"
           },
           "type": "WAIT"
         },
         {
           "name": "send_click_follow_up_email",
           "taskReferenceName": "http_1_ref",
           "inputParameters": {
             "uri": "https://api.sendgrid.com/v3/mail/send",
             "method": "POST",
             "accept": "application/json",
             "contentType": "application/json",
             "encode": true,
             "body": {
               "personalizations": [
                 {
                   "to": [
                     {
                       "email": "${webhook_ref.output.request[0].email}"
                     }
                   ],
                   "subject": "🌟 Ready to Unlock the Full Potential of AI Agent?"
                 }
               ],
               "from": {
                 "email": ""
               },
               "content": [
                 {
                   "type": "text/plain",
                   "value": "Hi,\n\nThank you for checking out the AI Agent—we noticed you took a closer look, and we’re excited to help you take the next step! 🚀\n\nOur AI Agent is designed to make your life easier, with a variety of powerful features that will save you time and boost your productivity:\n\n- Automate Repetitive Tasks: Let AI handle the routine stuff so you can focus on the bigger picture.\n- Personalized Assistance: Get 24/7 support tailored to your needs.\n- Seamless Integration: Easily connect AI Agent with the tools and platforms you already use.\n\n🛍 Here’s Your Special Offer:\n- 10% off when you sign up in 7 days.\n- Exclusive Early Access to all features, before they’re made available to the public.\n\n👉 Ready to get started? https://example.com\n\nWe truly believe the AI Agent can transform the way you work and would love for you to experience its benefits firsthand. If you have any questions or need assistance, don’t hesitate to reach out—we’re here to help!"
                 }
               ]
             },
             "headers": {
               "Authorization": "Bearer ${workflow.secrets.SendGrid}"
             }
           },
           "type": "HTTP"
         }
       ],
       "open": [
         {
           "name": "wait_before_open_follow_up",
           "taskReferenceName": "wait_ref",
           "inputParameters": {
             "duration": "10 seconds"
           },
           "type": "WAIT"
         },
         {
           "name": "send_open_follow_up_email",
           "taskReferenceName": "http_ref",
           "inputParameters": {
             "uri": "https://api.sendgrid.com/v3/mail/send",
             "method": "POST",
             "accept": "application/json",
             "contentType": "application/json",
             "encode": true,
             "body": {
               "personalizations": [
                 {
                   "to": [
                     {
                       "email": "${webhook_ref.output.request[0].email}"
                     }
                   ],
                   "subject": "Still Thinking About AI Agent? Here's What You Need to Know!"
                 }
               ],
               "from": {
                 "email": ""
               },
               "content": [
                 {
                   "type": "text/plain",
                   "value": "Hi,\n\nWe noticed that you opened our email about the AI Agent—but haven’t had a chance to explore it fully yet. We wanted to make sure you don’t miss out on how this AI-powered tool can transform the way you work!\n\nHere’s a quick reminder of what AI Agent can do for you:\n\n- Automate Time-Consuming Tasks: Let the AI take over repetitive processes so you can focus on more important things.\n- 24/7 Personal Assistant: Get support whenever you need it—no matter the time of day.\n- Integrate with Your Workflow: Effortlessly connect AI Agent to your favorite tools for a seamless experience.\n\n💡 Why Act Now?\n- 10% off if you sign up in 7 days.\n- Exclusive Early Access: Be one of the first to harness the power of our AI Agent before it’s available to everyone!\n\n👉 **Don’t miss out: https://example.com\n\nWe truly believe that AI Agent will be a game-changer for you, and we'd love for you to experience it firsthand. If you have any questions or need more details, just reply to this email!\n\nLooking forward to hearing from you!\n\nBest regards,"
                 }
               ]
             },
             "headers": {
               "Authorization": "Bearer ${workflow.secrets.SendGrid}"
             }
           },
           "type": "HTTP"
         }
       ]
     },
     "defaultCase": [],
     "evaluatorType": "value-param",
     "expression": "switchCaseValue"
   }
 ],
 "inputParameters": [
   "input"
 ],
 "schemaVersion": 2
}
- Rename the workflow Name to something unique.
- Select Save > Confirm.
Now that the workflow is set up, the next step is to get the API keys from your SendGrid account.
Step 2: Get the API key from the SendGrid account
To send follow-up emails, Conductor’s HTTP task calls SendGrid’s Send Message API. This API request is authenticated using the SendGrid API key.
To get the API key:

- Sign in to SendGrid.
- Go to Settings > API Keys from the left navigation menu.
- Select Create API Key, and generate the key with Full Access permission.
- Copy and store the key.
Now that you have the API key, the next step is to store it as a secret in Conductor.
Step 3: Store the SendGrid API key as a Secret in Conductor
Conductor’s Secrets feature provides a secure way to store sensitive information that workflow definitions should not expose. By storing these values as secrets, you can reference them within workflows without revealing the actual values. This ensures better security and helps maintain the confidentiality of critical data.
Go to Definitions > Secret on your Conductor cluster to create a secret. Ensure that the Secret name is SendGrid, matching the secret name used in the workflow definition.

Your API key is now securely stored with Conductor.
Returning to your workflow, you can verify that this secret authorizes the SendGrid API request within the HTTP task.

Step 4: Create a webhook in Conductor
The next step is to create a webhook in Conductor that will listen for events coming from SendGrid.
To create a webhook:
- Go to Definitions > Webhook from the left navigation menu on your Conductor cluster.
- Select + New webhook.
- Configure the following parameters:
- In Webhook name, enter a unique name for the webhook.
- In Workflows to receive Webhook event, select the workflow created in Step 1.
- Select the Source platform as SendGrid.
- Select Save.

An unverified webhook URL will be generated, which is to be copied to the SendGrid webhook.
Step 5: Configure an event webhook in SendGrid
Next, you must set up an event webhook in SendGrid to send events to your Conductor webhook.
To create an event webhook in SendGrid:
- Go to Settings > Mail Settings from the left menu on your SendGrid Console.
- In Webhook Settings > Event Webhooks, select Create new Webhook.
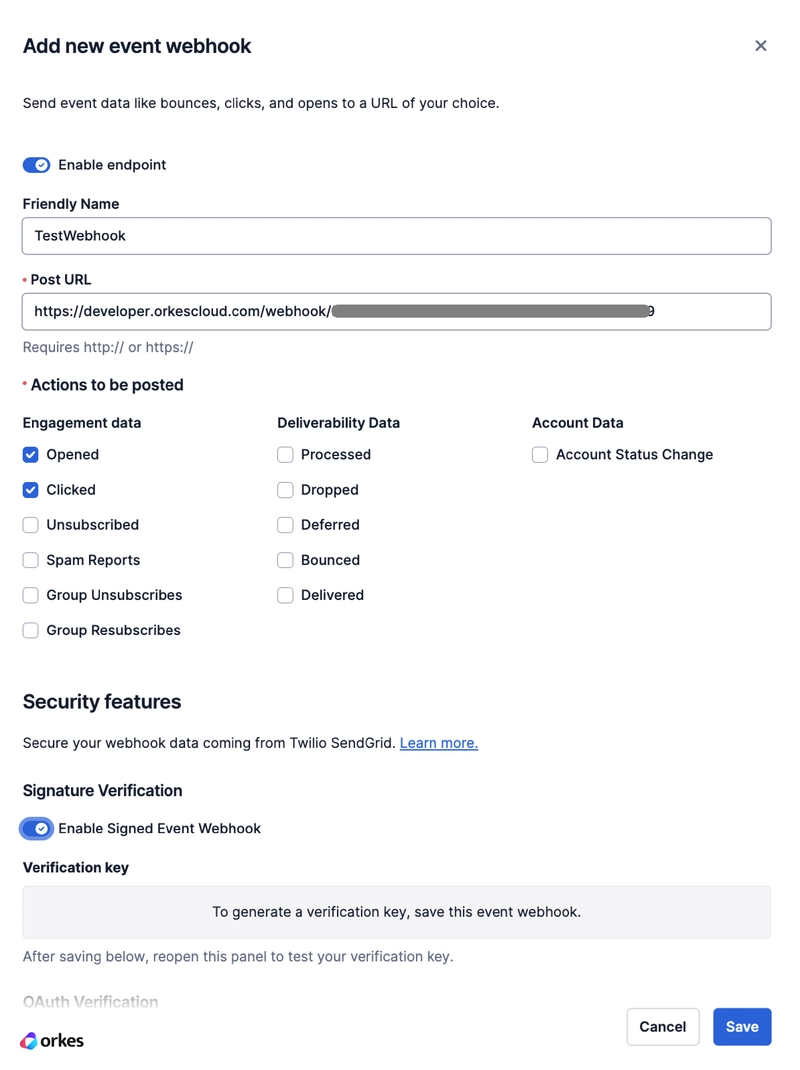
- Configure the following parameters:
- Provide a Friendly Name.
- In Post URL, enter the unverified webhook URL generated in Conductor
- In Actions to be posted, select Opened and Clicked.
- In Signature verification, toggle on Enable Signed Event Webhook.
- Select Save.
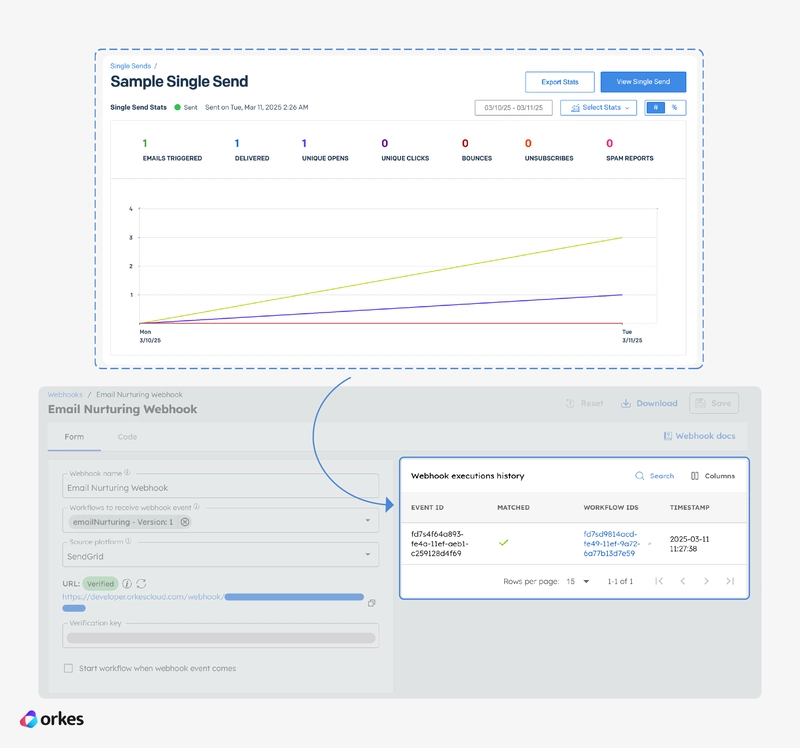
Next, copy the Verification key from SendGrid and paste it into the Conductor webhook.

To verify the webhook URL, go back to SendGrid and select Test Integration. This sends a test event to the Conductor webhook, verifying the URL.

Step 6: Modify and run Conductor workflow
Before running the workflow, you need to modify it to include the verified SendGrid sender email, which will be used when sending the campaigns.
To modify the workflow definition:
- Open your workflow definition, and select send_open_follow_up_email task.
- Update the From email address to your SendGrid account’s verified sender email.

- Repeat Step 2 for the send_click_follow_up_email task.
- Save the workflow.
Now, let’s run the workflow.
The Wait for Webhook’s task input matches are wired to the workflow input:
   "inputParameters": {
       "matches": {
         "request[0].event": "${workflow.input.input}"
       }
     }
Since the workflow is designed to send follow-up emails on “opened” or “clicked” events, the SendGrid webhook event payloads are open and click, respectively.
For testing purposes, we’ll start with an open event.
- Go to the Run tab and provide the input parameter.
{
 "input": "open"
}
- Select Run workflow.
The workflow is now running and waiting for events from SendGrid.
Step 7: Create a Single Send in SendGrid
Next, let’s send the SendGrid campaign. Campaigns are scheduled in production, but here, we’ll create a Single Send to test the workflow.
Prerequisites:
- The sender email should be verified.
- A recipient list must be created.
To create a single send:
- Go to Marketing > Single Send from the left menu on your SendGrid console.
- Select Create a Single Send.
- Draft your email content.
- Configure the Single Send settings.

- Ensure the From Sender email matches the one used in the HTTP task.
- Review the email content and select Review Details and Send.
This schedules the email to be sent immediately, typically within 2 minutes.

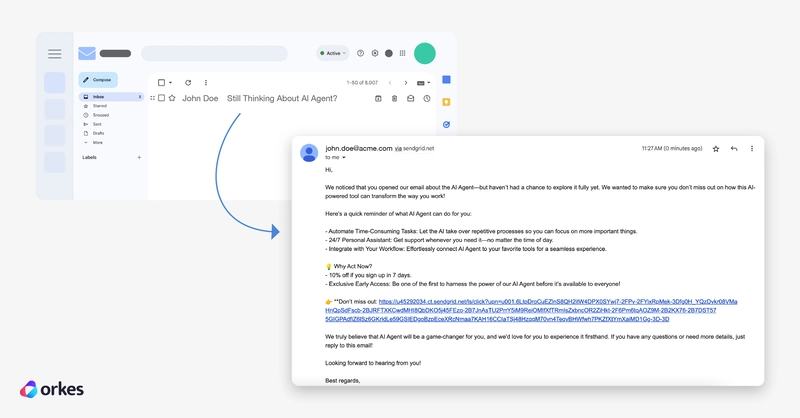
When the recipient opens the email (one of the events configured in the SendGrid webhook), the event triggers and is sent to the Conductor.
Checking the workflow execution, you can verify that the Wait for Webhook task is completed and the workflow proceeds with the “open” case.

The wait task is configured for 10 seconds for testing purposes. In a production environment, the follow up emails are ideally sent after 3-4 days, so the Wait task must be adjusted accordingly.
After 10 seconds, a follow-up email is sent via the SendGrid API, and the workflow completes successfully.
Similarly, you can trigger the workflow for a “click” event.
Step 8: Automate using Workflow Scheduler
The final step is automating the workflow to run in sync with your SendGrid campaigns.
Tip: Before automation, update the workflow’s wait period to 3 or 4 days, depending on when you want to send the follow-up email.
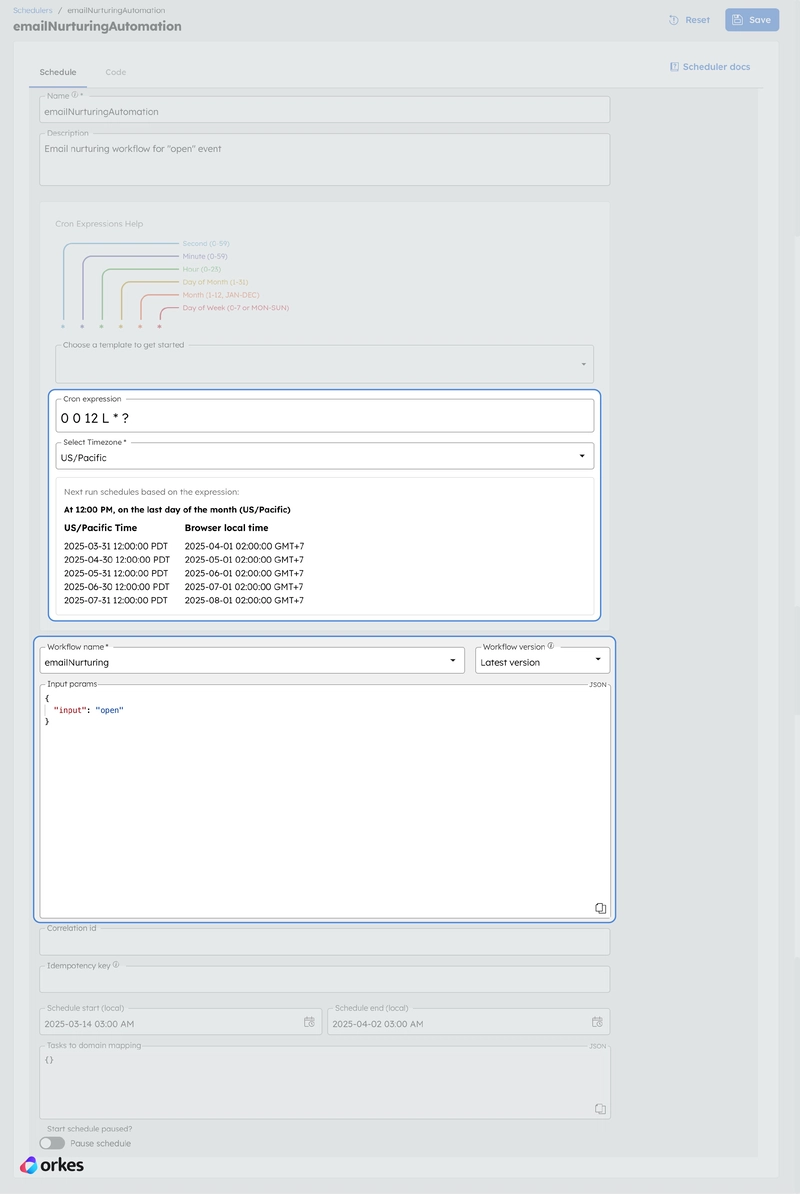
For example, let’s say your product launch email is scheduled on the last day of the month.
Now, we need to create a workflow schedule that will trigger the workflow simultaneously with both inputs (“open” and “click”), automating the entire process.
To trigger the workflow simultaneously for an “open” event, create a Workflow Schedule and use cron expressions to run it on the last day of the month.
Similarly, another schedule can be created for the “click” event using Conductor’s clone functionality. You can clone the schedule and update the workflow input accordingly.

Here’s the cloned schedule for the “click” event:

With the workflow schedulers in place, both the “open” and “click” workflows will be triggered along with the corresponding email campaigns from SendGrid.
Congratulations! You’ve successfully created an automated email nurturing flow for a product launch campaign. This workflow can now be reused for future product launches, ensuring a streamlined process. You can also leverage features like Workflow Versioning to manage different email content for A/B testing.
Feel free to modify the workflow further to suit your needs—whether by adding more follow-up emails or customizing actions based on user behavior.
Summary
Using SendGrid webhooks in Conductor, you’ve created an automated email nurturing workflow that responds to user interactions. This reusable flow streamlines future product launches and campaigns, enabling you to focus on optimizing strategies instead of managing responses manually.
–
Conductor is an open-source orchestration platform used widely in mission-critical applications such as AI/LLM systems, event-driven systems, and microservice or API-first systems. Try it out using our online Developer Edition sandbox, or get a demo of Orkes Cloud, a fully managed and hosted service that can scale seamlessly to meet all enterprise needs.