One could learn how an oven works, but that doesn’t mean that you’ve learned how
to cook. Similarly, one could understand the syntax of a machine learning tool,
and still not be able to apply the technology in a meaningful way. That’s why in
this blogpost I’d like to describe some topics that surround the creation of a
spaCy project that isn’t directly related to syntax and instead relate more to
“the act” of doing an NLP project in general.
As an example use-case to focus on, we’ll be predicting tags for GitHub issues.
The goal isn’t to discuss the syntax or the commands that you’ll need to run.
Instead, this blog post will describe how a project might start and evolve.
We’ll start with a public dataset, but while working on the project we’ll also
build a custom labelling interface, improve model performance by selectively
ignoring parts of the data and even build a model reporting tool for spaCy as a
by-product.
Motivating example
Having recently joined Explosion, I noticed the manual effort involved in
labelling
issues on the spaCy GitHub repository.
Talking to colleagues who maintain the tracker on a daily basis, they mentioned
that some sort of automated label suggester could be helpful to reduce manual
load and enforce more labelling consistency.
This repository has over 5000 issues, most of which have one or more tags
attached that the project’s maintainers have added. Some of these tags, for
example, indicate that it’s about a bug, while others show there’s an issue in
the documentation.
I discussed the idea of predicting tags with Sofie, one of the core developers
of spaCy. She was excited by the idea and would support the project as the
“domain expert” who could explain the details of the project whenever I would
miss the relevant context.
After a small discussion, I verified some important project properties.
- There was a valid business case to explore. Even if it was unclear what we
should expect from a model, we did recognize that having a model that could
predict a subset of tags could be helpful. - There is a labelled dataset available with about 5000 examples, that could be
downloaded easily from the GitHub API. While the labels may not be perfectly
consistent, they should certainly suffice as a starting point. - The problem was well defined in the sense that we could translate the problem
down to a text categorization task. The contents of a GitHub issue contained
text that we needed to classify into a set of non-exclusive classes that were
known upfront.
This information was enough for me to get started.
Step 1: project setup
To get an overview of the steps needed in my pipeline, I typically start out by
drawing on a digital whiteboard. Here’s the first drawing I made.

To describe each step in more detail:
- First, a script downloads the relevant data from the GitHub API.
- Next, this data would need to be cleaned and processed. Between the sentences
describing the issue, there would also be markdown and code blocks, so some
sort of data cleaning step is required here. Eventually, this data needed to
be turned into the binary.spacyformat so that I can use it to train a
spaCy model. - The final step would be to train a model. The hyperparameters would need to
be defined upfront in a configuration file and the trained spaCy model would
then be saved on disk.
This looked simple enough, but the “preprocess” step felt a bit vague. So I
expanded that step.
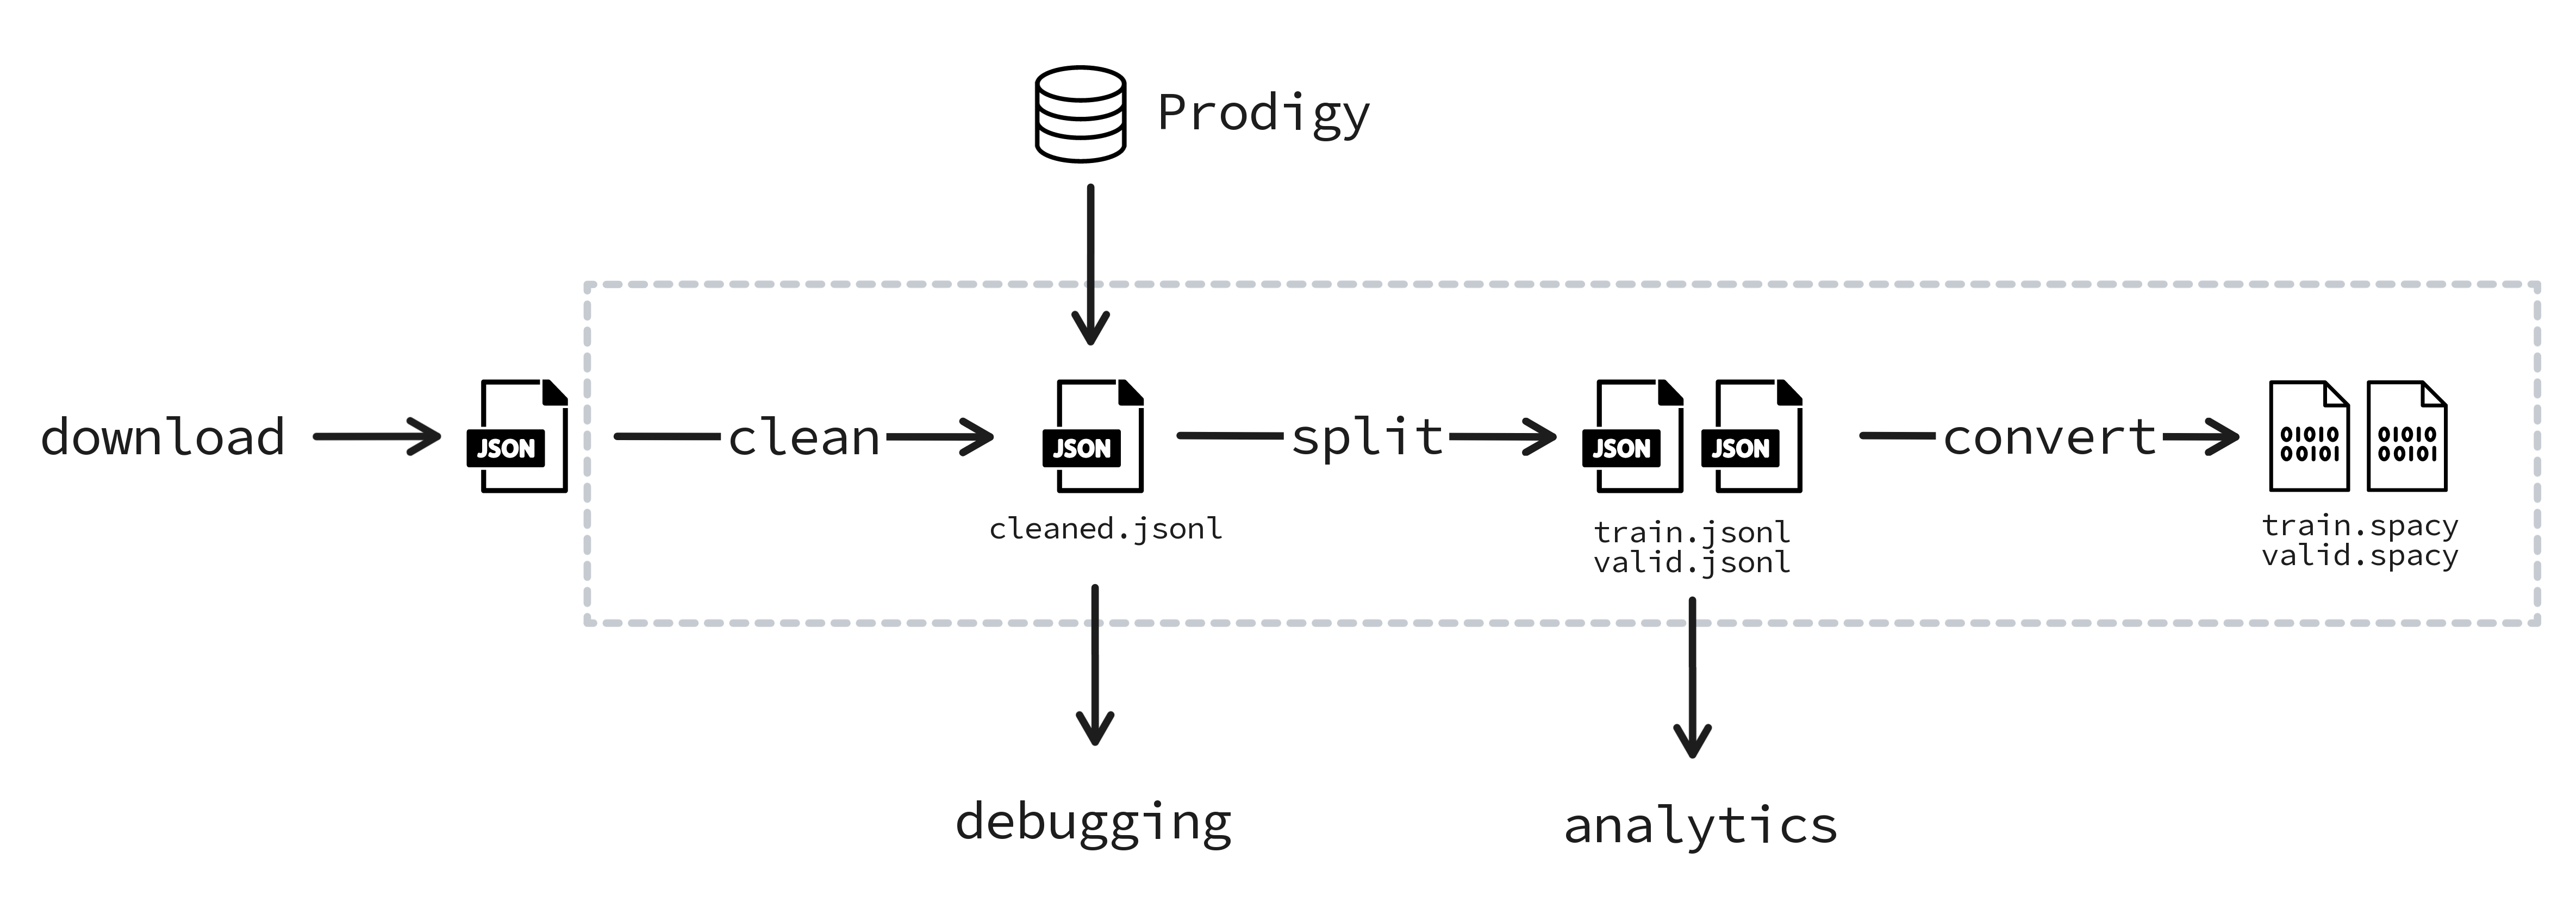
I decided to make the distinction between a couple of phases in my preprocess
step.
- First, I decided that I needed a clean step. I wanted to be able to debug
said cleaning step so that meant that I also needed an inspectable file with
clean data on disk. I usually also end up re-labelling some of the data with
Prodigy when I’m working on a project and a cleaned
.jsonlfile would allow me to update my data at the start of the pipeline. - Next, I needed a split step. I figured I might want to run some manual
analytics on the performance on the train and validation set. That meant that
I needed the.jsonlvariants of these files on disk as well. The reason I
couldn’t use the.spacyfiles for this was that the.jsonlfiles can
contain extra metadata. For example, the raw data had the date when the issue
was published, which would be very useful for sanity checks. - Finally, I’d need a convert step. With the intermediate files ready for
potential investigation, the final set of files I’d need is the.spacy
versions of the training and validation sets.
Reflection
Implementing the code I need for a project is a lot easier when I have a
big-picture idea of what features are required. That’s why I love doing the
“solve it on paper first” exercise when I’m starting. The drawn diagrams don’t
just help me think about what I need; they also make for great documentation
pieces, especially when working with a remote team.
When the drawing phase was done, I worked on a project.yml file that defined
all the steps I’d need.
What did the project.yml file look like?
A project.yml file in spaCy contains a description of all the steps, with
associated scripts, that one wants to use in a spaCy project. The snippet below
omits some details, but the most important commands I started with were:
workflows:
all:
- download
- clean
- split
- convert
- train
preprocess:
- clean
- split
- convert
commands:
- name: 'download'
help: 'Scrapes the spaCy issues from the Github repository'
script:
- 'python scripts/download.py raw/github.jsonl'
- name: 'clean'
help: 'Cleans the raw data for inspection.'
script:
- 'python scripts/clean.py raw/github.jsonl raw/github_clean.jsonl'
- name: 'split'
help: 'Splits the downloaded data into a train/dev set.'
script:
- 'python scripts/split.py raw/github_clean.jsonl assets/train.jsonl
assets/valid.jsonl'
- name: 'convert'
help: "Convert the data to spaCy's binary format"
script:
- 'python scripts/convert.py en assets/train.jsonl corpus/train.spacy'
- 'python scripts/convert.py en assets/valid.jsonl corpus/dev.spacy'
- name: 'train'
help: 'Train the textcat model'
script:
- 'python -m spacy train configs/config.cfg --output training/
--paths.train corpus/train.spacy --paths.dev corpus/dev.spacy --nlp.lang
en'
What did the folder structure look like?
While working on the project file, I also made a folder structure.
📂 spacy-github-issues
┣━━ 📂 assets
┃ ┣━━ 📄 github-dev.jsonl (7.7 MB)
┃ ┗━━ 📄 github-train.jsonl (12.5 MB)
┣━━ 📂 configs
┃ ┗━━ 📄 config.cfg (2.6 kB)
┣━━ 📂 corpus
┃ ┣━━ 📄 dev.spacy (4.0 MB)
┃ ┗━━ 📄 train.spacy (6.7 MB)
┣━━ 📂 raw
┃ ┣━━ 📄 github.jsonl (10.6 MB)
┃ ┗━━ 📄 github_clean.jsonl (20.3 MB)
┣━━ 📂 recipes
┣━━ 📂 scripts
┣━━ 📂 training
┣━━ 📄 project.yml (4.1 kB)
┣━━ 📄 README.md (1.9 kB)
┗━━ 📄 requirements.txt (95 bytes)
The training folder would contain the trained spaCy models. The recipes folder
would contain any custom recipes that I might add for Prodigy and the scripts
folder would contain all the scripts that handle the logic that I drew on the
whiteboard.
Step 2: learning from a first run
With everything in place, I spent a few hours implementing the scripts that I
needed. The goal was to build a fully functional loop from data to model first.
It’s much easier to iterate on an approach when it’s available from start to
finish.
That meant that I also did the bare minimum for data cleaning. The model
received the raw markdown text from the GitHub issues, which included the raw
code blocks. I knew this was sub-optimal, but I really wanted to have a working
pipeline before worrying about any details.
- Once the first model had been trained, I started digging into the model and
the data. From that exercise, I learned a few important lessons. First, there
are 113 tags in the spaCy project, many of which aren’t used much. Especially
the tags that relate to specific natural languages might only have a few
examples. - Next, some of the listed tags were not going to be relevant, no matter how
many training examples there were. For example, thev1tag indicates that
the issue is related to a spaCy version that’s no longer maintained.
Similarly, thewontfixtag indicates a deliberate choice from the project
maintainers, and the reasoning behind that choice will typically not be
present in the first post of the issue. Any algorithm realistically has no
way of predicting this kind of “meta” tag. - Finally, the predictions out of spaCy deserved to be investigated further. A
spaCy classifier model predicts a dictionary with label/confidence pairs. But
the confidence values tend to differ significantly between tags.
I wanted to prepare for my next meeting with Sofie. So the next step was to make
an inventory of what we might be able to expect out of the current setup.
Step 3: build your own tools
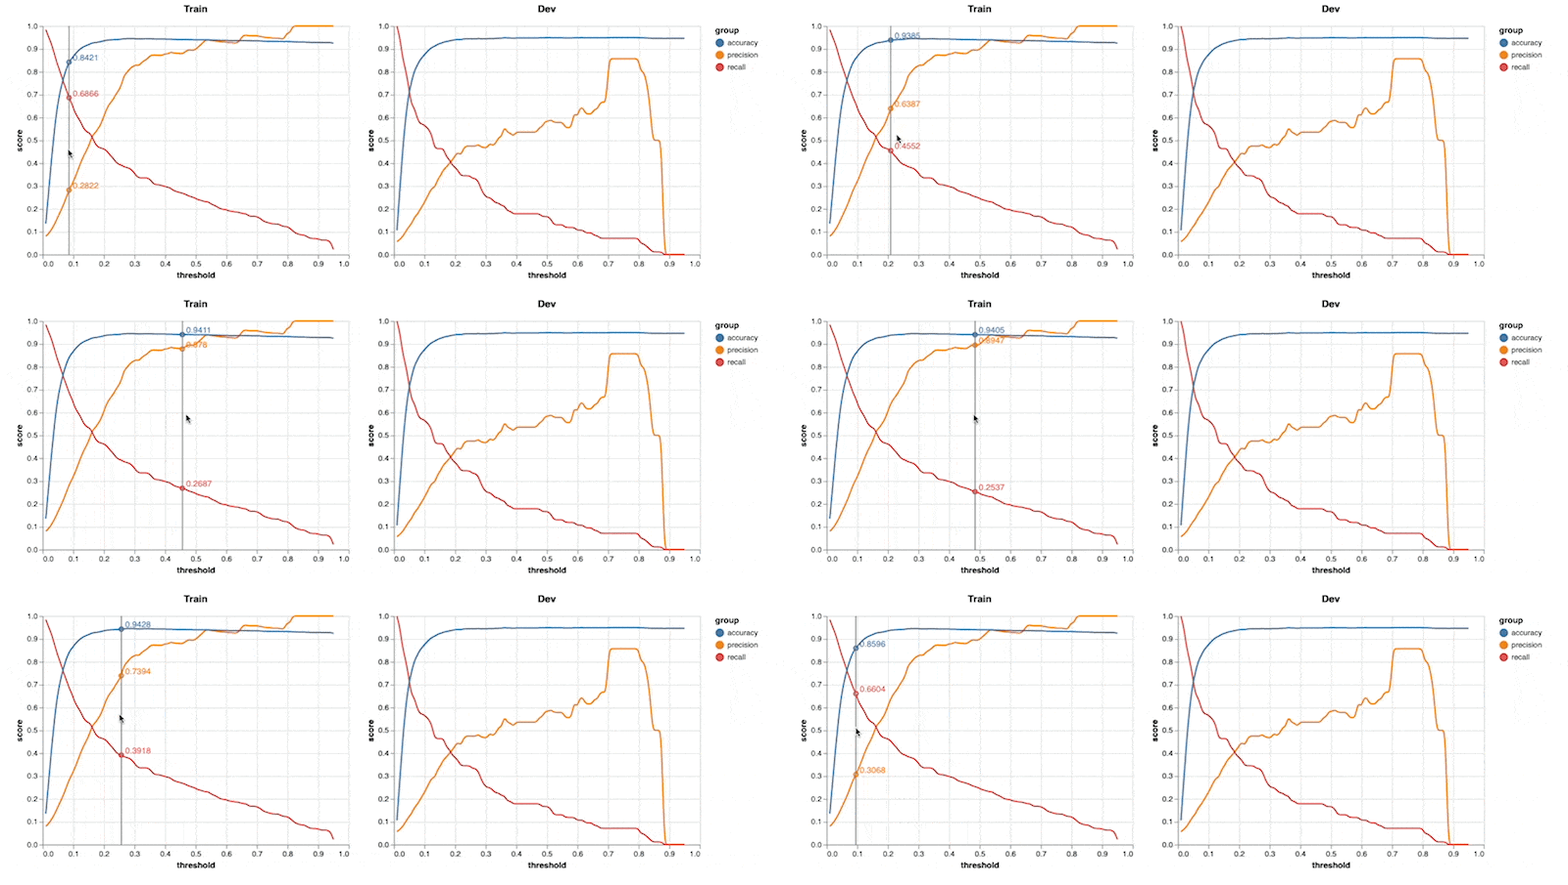
To better understand the model performance, I decided to build a small dashboard
that would allow me to inspect the performance of each tag prediction
individually. If I understand the relation between the threshold of a tag and
the precision/recall performance, then I could use that in my conversation with
Sofie to confirm if the model was useful.
I proceeded to add a script to my project.yml file that generated a few
interactive charts in a static HTML file. That way, whenever I’d retrain my
model, I’d be able to automatically generate an interactive index.html file that
allowed me to play around with threshold values.
Here’s what the dashboard would show me for the docs tag.

With this dashboard available, it was time to check back in with Sofie to
discuss which tags might be most interesting to explore further.
Step 4: reporting back
The meeting that followed with Sofie was exciting. As a maintainer, she had a
lot of implicit knowledge that I was unaware of, but because I was a bit closer
to the data at this point, I also knew things that she didn’t. The exchange was
very fruitful, and a couple of key decisions got made.
- First, Sofie pointed out that I was splitting my train/test sets randomly and
that this was not ideal and that I should take the recent issue data as my
test set. The main reason was that the way the issue tracker was used has
changed a few times over time. The project gained new tags over time, new
conventions as new maintainers joined the project and the repository also
recently added GitHub discussions, which caused a lot of issues to become
discussion items instead. - Next, Sofie agreed that we should only focus on a subset of tags. We decided
to only look at tags that appear at least 180 times. - Finally, I asked Sofie how much I could trust the training data. After a
small discussion, we agreed it would be good to double-check some examples
because it’s possible that some of the tags weren’t assigned consistently.
While the spaCy core team has been very stable over the years, the specific
set of people doing support has varied a bit over time. I had also spotted
some issues that didn’t have any tags attached, and Sofie agreed that these
were good candidates to check first.
I agreed to pick up all of these items as the next steps.
Step 5: lessons from labelling
I adapted the scripts that I had and moved on to create a custom labelling
recipe for Prodigy. I wanted the issues to render just like they would render on
Github so I took the effort of integrating the
CSS that GitHub uses to
render markdown.
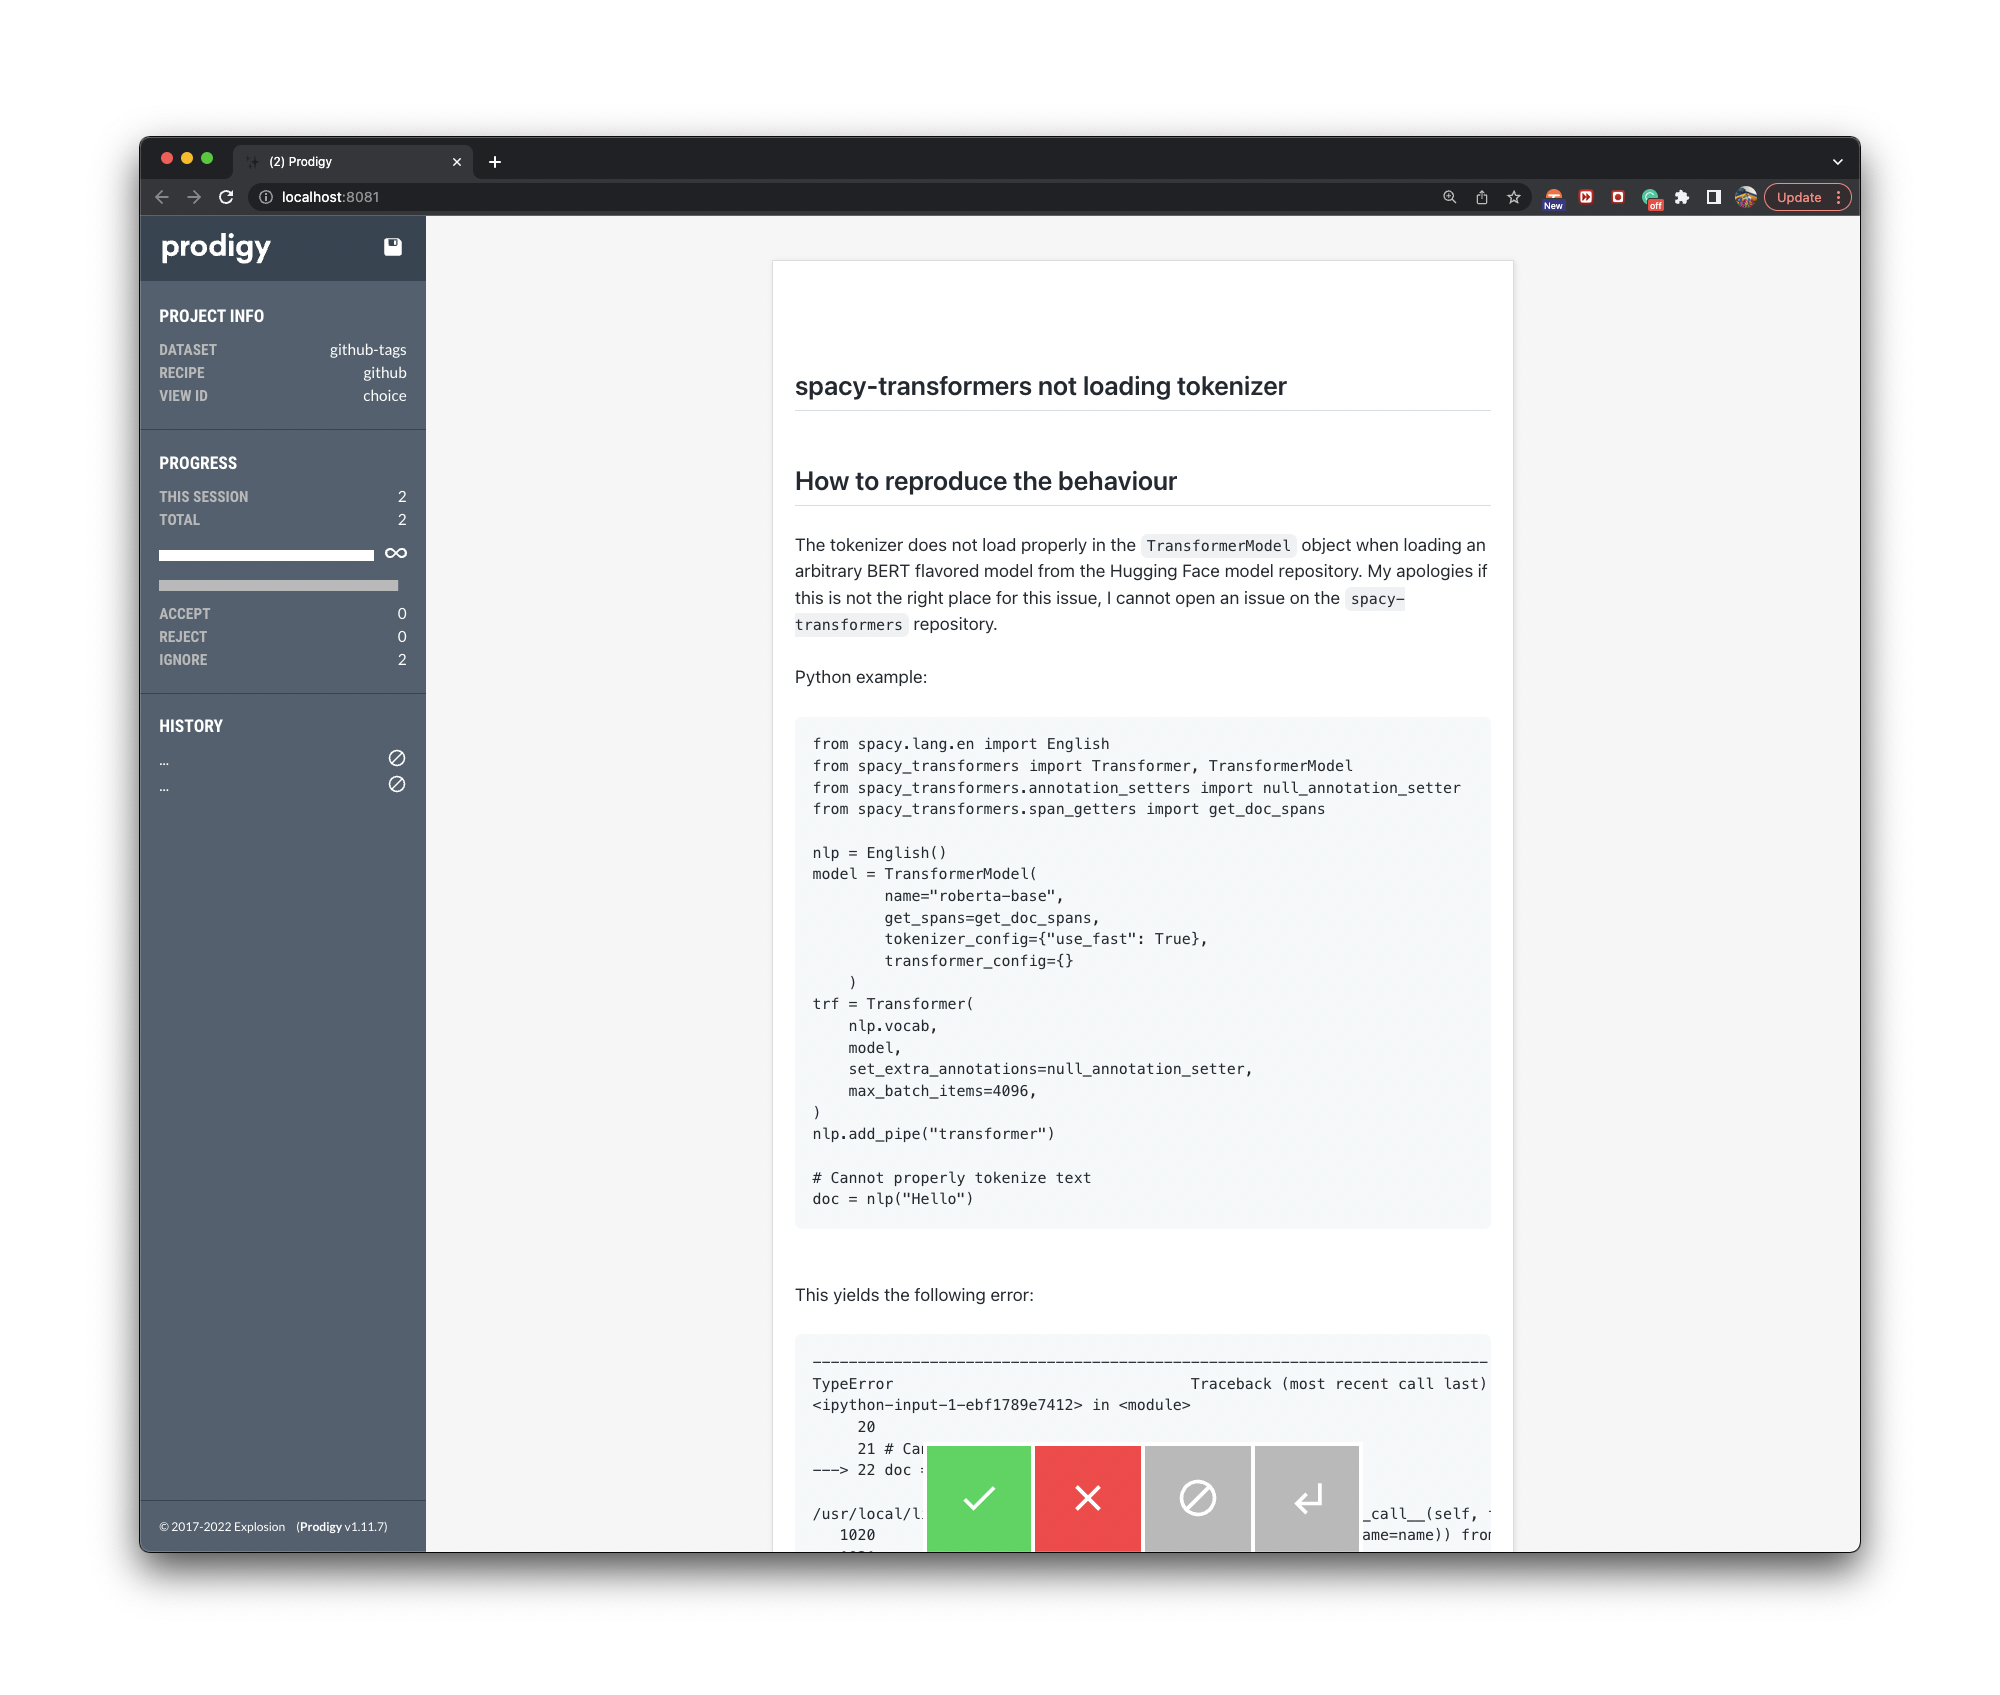
I was happy with how the issue was rendered, but I quickly noticed that some of
these issues are very long. I was mindful of my screen real-estate which is why
I did some extra CSS work to get the entire interface loaded in a two-column
layout.
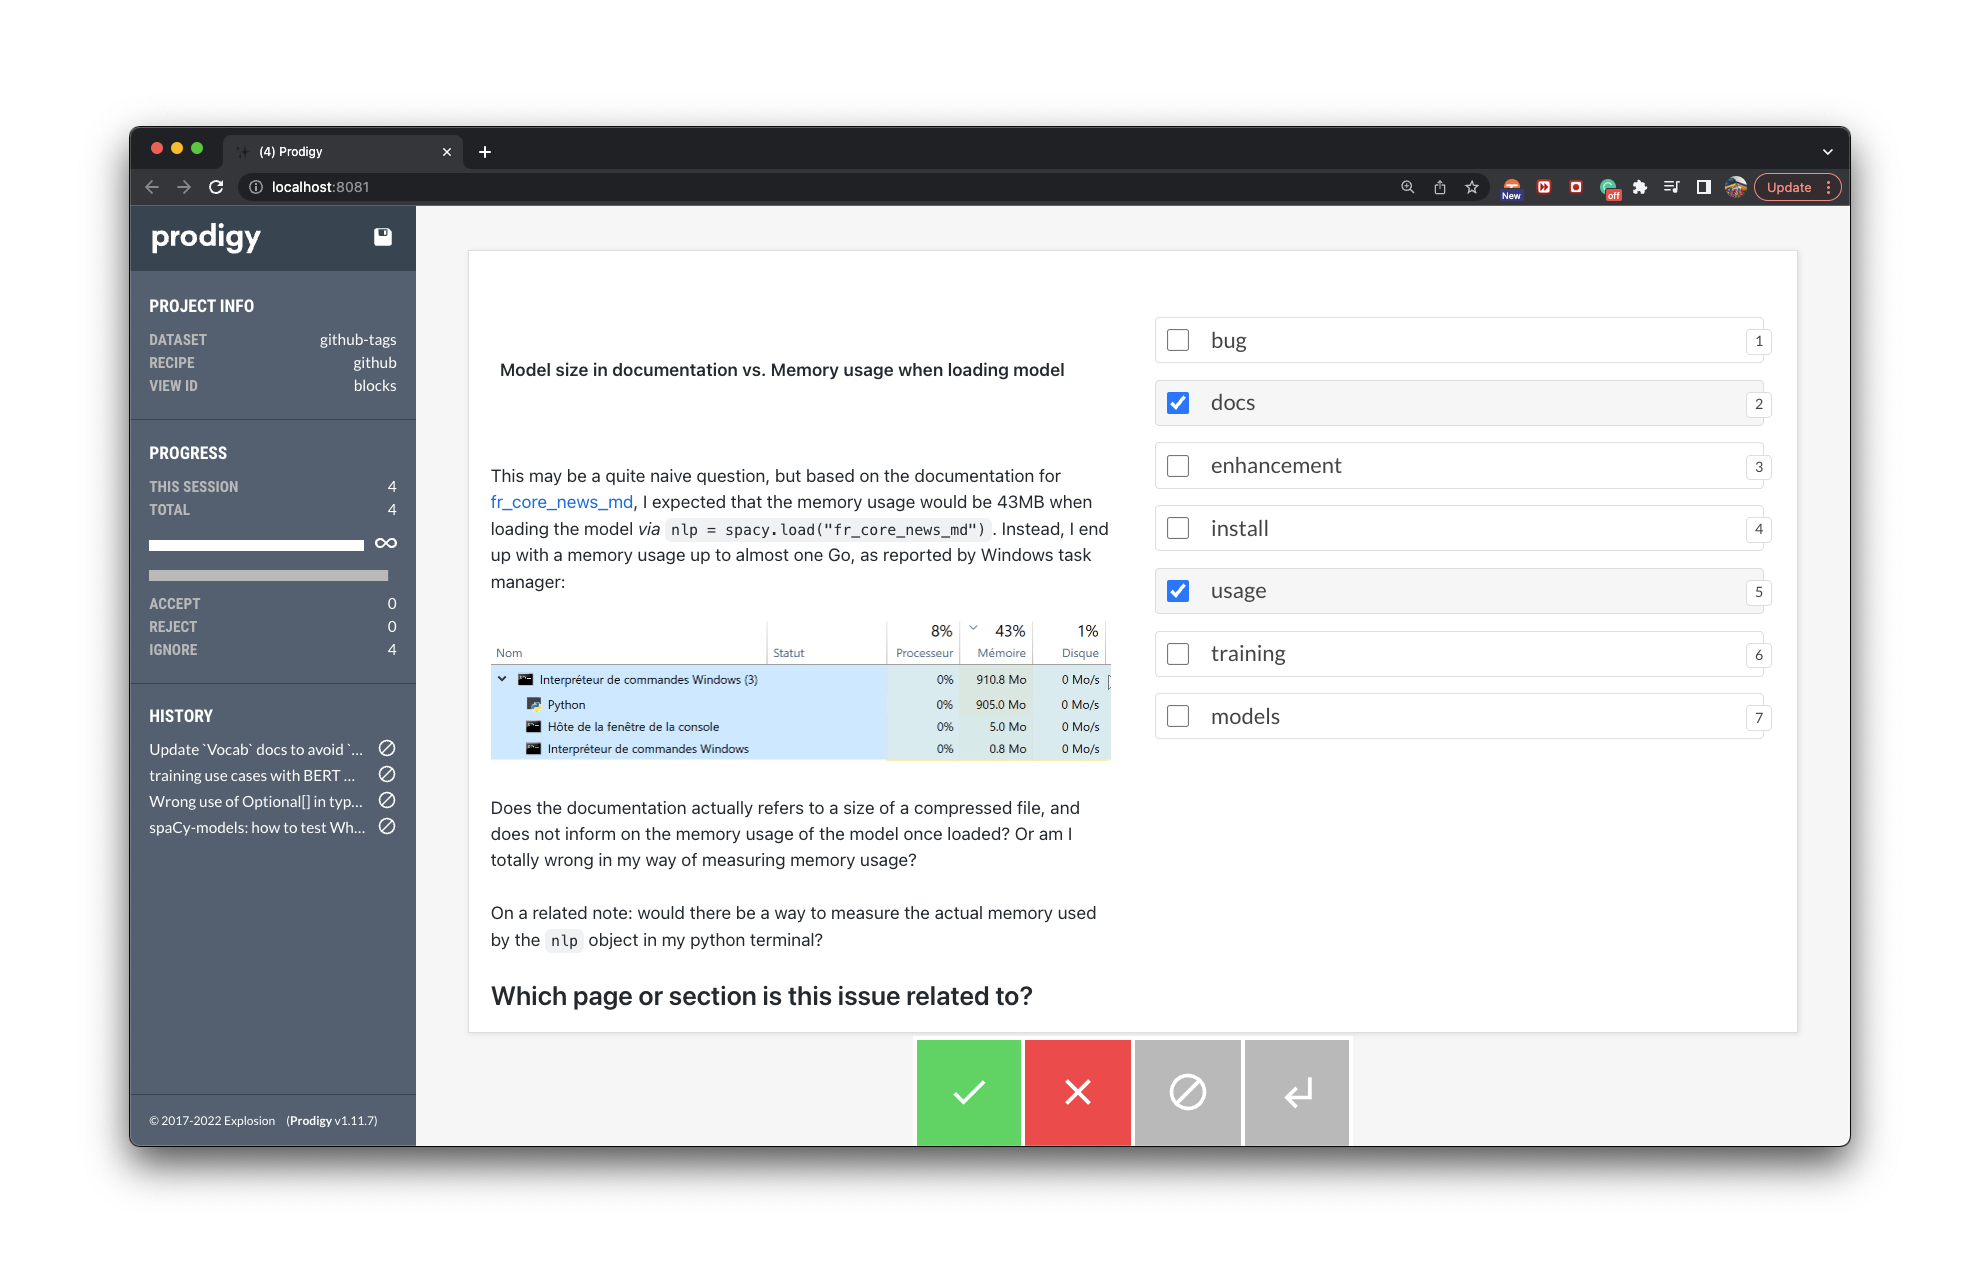
This two-column layout was just right for my screen. The images would render
too, which was a nice bonus of the setup.
That meant now it was ready to label. So I checked the data by trying out a few
tactics.
-
I started by looking at any examples that didn’t have any tags attached. Many of these examples turned out to be short questions more related to the usage (and non-usage) of the library. These would include things like “can I get spaCy to run on mobile?“. It’d often be about an example where the tokenizer or the part of speech tagger did something unexpected. Many of these examples didn’t describe an actual bug but rather described an expectation of a user which therefore also belongs to the “usage” tag.
-
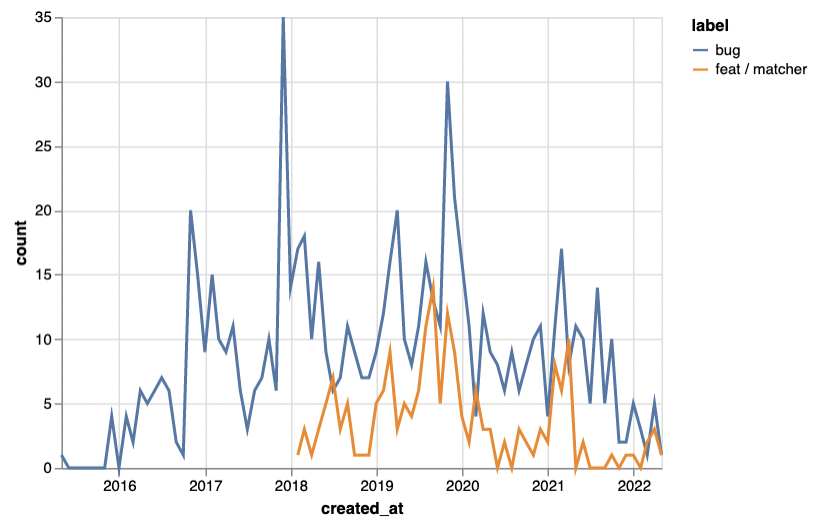
Next, I decided to check examples by sampling them randomly. By labelling this way, I noticed that many examples with the “bug” tag missed an associated tag that would highlight the relevant part of the codebase. After doing some digging, I learned that, for example, the feat / matcher tag was introduced much later than the bug label. That meant that many relevant tags could be missing from the dataset if the issue appeared before 2018.
-
Finally, I figured I’d try one more thing. Given the previous exercise, I felt that the presence of a tag was more reliable than the absence of a tag. So I used the model that I had trained and had it try to predict the feat / matcher tag. If this tag were predicted while it was missing from an example, it’d be valid to double-check. There were 41 of these examples, compared to 186 labelled instances that had a feat / matcher tag. After labelling, I confirmed that 37/41 were wrongly missing the tag. It also turned out that 29/37 of these examples predate 2018-02, which was when the
feat / matcherlabel was introduced.
Given these lessons, I decided to reduce my train set. I’d only take examples
after 2018-02 to improve the consistency. Just doing this had a noticeable
effect on my model performance.
| Epoch | Step | Score Before | Score After |
|---|---|---|---|
| 0 | 500 | 57.97 | 61.31 |
| 0 | 1000 | 63.10 | 66.61 |
| 0 | 1500 | 64.85 | 70.99 |
| 0 | 2000 | 67.47 | 73.65 |
| 0 | 2500 | 71.53 | 75.77 |
| 1 | 3000 | 71.79 | 77.93 |
| 1 | 3500 | 73.20 | 79.11 |
This was an interesting observation; I only modified my training data and didn’t
change the test data that I use for evaluation. That means that I improved the
model performance by iterating on the data instead of the model.
I decided to label some more examples that might be related to the
feat / matcher tag before training the model one more time. I made subsets by
looking for issues that had the term “matcher” in the body. This gave me another
50 examples.
Step 6: another progress report
After training the model again, and after inspecting the threshold reports, I
figured I hit a nice milestone. I zoomed in on the feat / matcher tag and
learned that I could achieve:
- a 75% precision / 75% recall rate when I select a threshold of 0.5.
- a 91% precision / 62% recall rate when I select a threshold of 0.84
These metrics weren’t by any means “state of the art” results, but they were
tangible enough to make a decision.
I presented these results to Sofie and she enjoyed the ability to consider the
threshold options. It meant that we could tune the predictions without having to
retrain a new model, even though the numbers were looking pretty good at the
original 0.5 threshold. As far as the feat / matcher tag was concerned, Sofie
considered the exercise a success.
The project could be taken further. We wondered about what other tags to
prioritize next and also started thinking about how we might want to run the
model in production. But the first exercise of building a model was complete,
which meant that we could look back and reflect on some lessons learned along
the way.
Conclusion
In this blog post, I’ve described an example of how a spaCy project might
evolve. While we started with a problem that was well defined, it was pretty
hard to predict what steps we’d take to improve the model and get to where we
are now. In particular:
- We analyzed the tags dataset which taught us that certain dates could be
excluded for data consistency. - We created a custom labelling interface, using the CSS from GitHub, which made
it convenient to improve and relabel examples in our training data. - We made a report that was specific to our classification task, which allowed
us to pick threshold values to suit our needs.
All of these developments were directly inspired by the classification problem
that we tried to tackle. For some subproblems, we were able to use pre-existing
tools, but it was completely valid to take the effort to make tools that are
tailored to the specific task. You could even argue that taking the time to do
this made all the difference.
Imagine if instead, we had put all of the efforts into the model. Is it really
that likely that we would have been in a better state if we had tried out more
hyperparameters?
The reason why I like the current milestone is because the problem is much
better understood as a result. That’s also why my interactions with Sofie were
so valuable! It’s much easier to customize a solution if you can discuss
milestones with a domain expert.
This lesson also mirrors some of the lessons we’ve learned while working on
client projects via our
tailored pipelines offering. It
really helps to take a step back to consider an approach that is less general in
favor of something a bit more bespoke. Many problems in NLP won’t be solved with
general tools, they’ll need a tailored solution instead.
Oh, and one more thing …
The custom dashboard I made in this project turned out to be very useful. I also
figured that the tool is general enough to be useful for other spaCy users.
That’s why I decided to
open-source it. You can
pip install spacy-report today to explore threshold values for your own
projects today!